Student procedures: Acquisitions Government Documents Opening/Processing
- Lisa Smith
- MSU TechServices
Summary: Instructions for students to open and process Government Documents items.
Brief Summary : Acquisitions U.S. Depository Opening/Processing Procedure
Check off shipping lists on appropriate cards in little basket.
Match pieces to shipping lists, checking off items as you go.
Tattletape all paper pieces.
Check “missing” pieces against not selected list in black binder.
Mark those not selected w/ NS in left margin IN PEN.
Circle those selected but not received IN PENCIL and give to supervisor.
Date stamp shipping list with “All checked by” and initials IN PEN.
Write Sudoc# IN BLACK PEN and stamp pieces.
Softcover (CDs & Microfiche, too—see below)

Pink tie shipping list to its pieces.
Leave on supervisor’s desk.
Preparing to Open
All incoming U.S. depository shipments are kept on the top U.S. Depository shelf between the CatMan student area and Kim’s cubicle. If you can tell which ones are newer and which are older, choose the oldest box or microfiche package to open first.
Depository boxes usually contain several shipping lists. Shipping lists for items are usually packed in right below those items. Boxes may contain microfiche, electronic (CDs, disks, etc.), and/or paper items. There may also be shipping lists for which there are no items in the box, because the items are shipped separately. (Read the procedure below on Separates Shipments.)
Microfiche may also be shipped separately from the microfiche contractor and arrive in separate envelopes rather than together in a large shipment. These fiche have no shipping list, so if you are working on them, skip all steps related to shipping lists. Instead, stamp as normal, write the Sudoc# as it appears on the fiche (see special instructions regarding Code of Federal Regulation fiche) and give to supervisor.
Opening
Open the package and remove the first items until you reach a shipping list or the first stack of shipping lists on top of the first items.
Check off each shipping list number IN BLACK PEN on the shipping list check-in cards, which are found in the little basket on the shelf above the bib support student desk near supervisor’s cubicle where the other gov docs opening supplies are kept. The cards are divided by paper, electronics, separates, and microfiche. The final letter of the shipping list number will match which category that shipping list belongs to–P stands for paper, E stands for electronic, S stands for separates, and M stands for microfiche. Once you’ve determined the category, choose the proper card using the year and the first two digits of the number following the first dash in the shipping list number. For instance, to find the card for the shipping list 2012-0013-P, you would go to the section of cards for Papers, then find the 2012 cards and from those choose the 0000’s card. If it was 2012-0157-P, you would do the same thing, but choose the 0100’s card.
Match the pieces that are present to the shipping lists, piece by piece. Check off each piece you have IN BLACK PEN. If there is no black pen available in the student area, ask your supervisor for one.
Items on the shipping list that we did not receive. If there are items on the shipping list that were not received—which will happen in almost EVERY shipment—check the Item Selection List (a computer print-out of items we don't select) to see if we were supposed to receive it. You will find it in the black notebook labeled “Non-Selection List” that’s kept on the gov docs opening supplies shelf. (Cont’d next page.)
Note: Items on the shipping list that we did not receive (cont’d). If an item's number is listed as not selected in the selections notebook (i.e. has an N next to its number rather than a Y), write NS for "not selected" by the item on the shipping list IN BLACK PEN and go on. If an item’s number is listed as selected (Y next to the item number rather than an N) but it ISN’T in the box with the shipping list, circle it and write “Missing” next to it IN PENCIL, complete work on the other items on shipping list, and give it to supervisor, mentioning that an item is missing.
Initial and date the shipping list. When all the items you have for a shipping list have been matched to that list and you have checked each item that wasn’t received against the selected/not selected list, date stamp the shipping list in the upper right and above it write “Checked by” with your initials IN BLACK PEN.
Note: There will be shipping lists with no matching items. Every item number on these lists also needs to be checked against the Item Selection list. If you do not have time to finish these at the time you are doing the opening (sometimes there will be a couple dozen lists all at once), put them in the top black basket on the top U.S. depository shelf. If you have time to finish them, give them to supervisor.
Processing Paper Items
Check each paper piece in the front and back to make sure it didn’t come with any supplementary CDs. If there is a CD, remove it and follow the procedures for CDs and DVDs below. CDs that come with paper pieces will STAY with that piece. Once the CD is in a labeled and stamped jewel case, pink tie it to the paper item with which it arrived.)
Tattle-tape each paper piece with single-sided (white) tape for hardback books (if the spine cover is loose enough to allow the wand to pass through unobstructed) and for items that are too thin for a double-sided tape, and double-sided (green) for hardbacks that are covered too tightly and for paperbacks.
Unlike approval books or non-current serials, ALL paper items except for single or single folded-page pieces will get taped, even if they are just stapled together or if they are less than a quarter-inch thick.
Write the Sudoc#.
For all items: When writing a Sudoc#, think ahead so you don't run out of room. If you don't have enough room, you can break up the Sudoc# ONLY AFTER PUNCTUATION. Try to leave the Sudoc# stem intact and break the Sudoc# after the colon. For example, if you didn’t have room for the Sudoc# “HE 20.3608:B 57/2/999” then “B 57/2/999” would be written under “HE 20.3608:”. If you had to break it up further, “999” could be taken to a third line. Try to think of how a student shelving this book or a patron looking for it will be reading it and keep the important information together. NEVER break up a cutter (the letter and number combination after the colon), “B 57” in the example above.
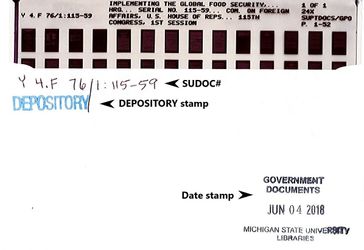
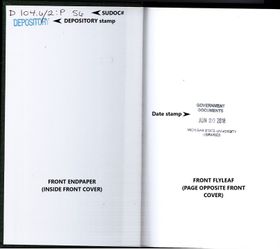
For softcover items: Write the Sudoc# on the item, in the upper left hand corner of the front cover IN BLACK PEN if the piece is softcover, and in the upper left hand corner of the inside front cover if it is hardback. If you can’t write it on the cover, write the Sudoc# inside on the upper left hand corner of the first right-hand page. If you make a mistake writing the Sudoc# on the book, write the Sudoc# on a label and put it over the incorrectly written Sudoc#.
For hardcover items: Before processing, remove and discard any book jacket. Do not write or stamp on the outside cover. Write the Sudoc# IN BLACK PEN on the far left of the left-hand side of the inside of the cover.
Note: Don't EVER write or stamp on maps other than the folded road maps and park guides. Give all other maps directly to supervisor for checking and sending to the map library. She will also retain a copy of the shipping list with “Sent to maps library” and the date written next to the items sent to maps for future reference.
Note: If you’re working on an item that is too slick to write on or is too dark for the Sudoc# to be seen, leave the space on the cover blank. The supervisor will fill these in with a label, slick surface pen, or white paint pen when she checks them. Most items can be written on, however, so try first before leaving it blank.
Stamp items. Stamp "depository" under the Sudoc# using the blue ink pad. Date stamp the piece on the bottom right corner of the cover if possible and if the piece is paperback, and in the center of the first right-hand page if it is hardcover. (This is a self-inking stamp; don’t use a stamp pad with it or it’ll make a mess.) On slick or dark items, date stamp on the inside on the first right-hand page in the bottom right corner rather than on the cover and put the depository stamp on a label in its usual spot. If the depository stamp has to go on a label, write the Sudoc# inside on the upper left hand corner of the first right-hand page and put the depository stamp beneath it there, too.
Don’t stamp on top of writing. The stamp may not be readable or may render the text in the piece unreadable. Stamp above writing or between chunks of text if possible. If you are unsure, ask your supervisor.
When you have completed working with a shipping list, pink tie the shipping list and all the pieces that came for it together and either give them to your supervisor or leave them on her desk. The supervisor will check them and sort them as either monographs or serials using either previous experience of Sudoc#’s or by checking the Bib Lvl designation for the Sudoc# in Sierra. Once sorted and checked for accuracy of student work, serials will go on the U.S. Depository shelf for checkin, and the monographs will go on the U.S. Shipping List shelf outside of W128 for Andrea James’s government document students to work on.
Visual Summary of Stamping and Writing:
Softcover (CDs & Microfiche, too—see below)
Processing Electronics (CD/DVDs)
CD/DVDs are processed almost exactly the same way papers are, with a few additional steps. U.S. depository CDs need hard (jewel) cases, not the paper or plastic CD envelopes. If you have some that came in paper CD envelopes, remove them and put them in jewel cases instead. (Extra cases are kept on the shelf with the other gov doc opening materials.)
The front of the case will look like the front cover of a paper piece, only all stamps and the Sudoc# will be on labels. The placement is identical. In addition, CD/DVDs get a pink sticker with special patron instructions. This will go immediately to the left of the date stamp, and are kept in the rack in the gov docs area with the other labels.
Remember, CDs and DVDs that come with paper pieces will get the same Sudoc# as the paper piece it came with and WILL STAY WITH that paper piece. Pink tie the paper piece to the jewel case(s) of any CDs that came with it.
When you are finished, give to supervisor for checking and sorting as you would papers.
Processing Microfiche
Microfiche, too, are processed very similarly to papers, with a few additional steps. The shipping lists come all stapled together. Before working with them, remove the staple and re-staple together any two-page shipping lists.
AE Code of Federal Regulations fiche have Sudoc#’s that must be written differently than they appear on the shipping lists and on the fiche themselves. Each of these Sudoc#’s should end in a year. Move this year immediately after the colon instead of writing it at the end. For example, if you are working with a Code of Federal Regulations fiche with the Sudoc# AE 2.106/3:
2/Pt.1/2017 you should write it on the fiche envelope as AE 2.106/3:2017/2/Pt.1 instead. The large majority of AE Sudoc# fiche will be Code of Federal Regulations fiche. Look at the title. If you are unsure whether a fiche’s Sudoc# needs to be changed or not, ask supervisor.
For microfiche, write the Sudoc# in the upper left corner of the front of the fiche envelope and stamp depository underneath. Date stamp on the lower right corner of the envelope. (The front of the envelope should look like the front cover of a paper piece.)
Go through each envelope of fiche to make sure that all sequential numbers are present. For instance, if the first fiche says 1 of 8 in the upper right corner, make sure that fiche 1 through 8 are present. Don’t just count the fiche without checking the numbers on them because sometimes numbers are repeated—so that there will be two fiche 2’s, for example.
If a microfiche title comes in multiple envelopes, write the Sudoc# on both envelopes. Also write (1of 2), (2 of 2), etc. on the envelopes underneath the depository stamp. Please do not write the number of fiche on the envelope, only the number of ENVELOPES. The fiche numbers are already on the fiche itself and are not necessary to repeat. THIS IS A VERY RARE OCCURRENCE.
When you are finished, rubberband the fiche together, fold the shipping list in half, and tuck the rubberbanded bundle of fiche that go with it inside. Give to supervisor for checking and sorting as you would papers.
Processing Separates
Separates are processed the same way other shipments are, except that the pieces that belong to each invoice won’t come in the same package so matching the items to the shipping lists requires extra steps. Separates can be electronics (CDs, etc.), papers, or maps. Separate shipments are processed in exactly the same way as other shipments except that the pieces were too large to fit in the regular U.S. shipment boxes, so list was sent in the regular sized box and the pieces were sent in separate packages, sometimes several over a period of weeks or (rarely) even months.
Note: Don't EVER write or stamp on maps other than the folded road maps and park guides. Give all other maps directly to supervisor for checking and sending to the map library. She will also retain a copy of the shipping list with “Sent to maps library” and the date written next to the items sent to maps for future reference.
Identify separates shipping lists. If you receive a shipping list in a U.S. Shipment box and there are no items that match it and the shipping list number is followed by an 'S', it is a separates shipping list.
When you find separates invoices, check them against the Non-Selected Items list, mark any items that have not been selected with NS. If none of the items were selected, give the shipping list to supervisor with the other items and shipping lists that came in the shipment. If there were selected items on it, put the shipping list in the bottom black tray on the top U.S. depository shelf. If other separates lists are already in the tray, put newly arrived ones UNDER the older ones.
Match separates packages to their shipping list. Each unopened separates package comes with the shipping list number its pieces belong to near the bottom of its shipping label. Typically each package contains only one item so that when a separates shipping list arrives you’ll be able to tell if all its items have also arrived by counting the number of matching packages.
Continue opening and processing as you would any other shipment. When you are finished, give to supervisor for checking and sorting as you would papers.