Load Monthly Records - MarcEdit Pre-import Updates for Monthly Records
Summary:
MarcEdit Pre-import Updates on GPO Monthly Record
MarcEdit Monthly Record files that overlay Shipping List records
SUMMARY:
- GPO Monthly Record files are named MSTUMPxxxx, with the xxxx representing the year and the month. The records in these files are supposed to overlay existing and brief shipping list records in FOLIO. There are edits made to the MarcEdit records before they are loaded. When updating the records in one of these files, change the file name by adding ‘load’ to the end of the file name. Example, MSTUMP2205_Load.mo.-year.mrk. Renaming the file preserves the original file received from Marcive, which is sometimes needed for a redo if needed.
Search FOLIO for a couple of the titles to verify that the file has not already been loaded into the catalog. Do not chance that the records have not already been loaded.
Below is an overview of the 4 edits made on each MarcEdit records:
- Copy all 001’s which contain the prefix of ‘tmp’ to a 949 field.
- Remove 003 field on tmp records.
- Add 949 field containing the location code of ‘gdus’ to all records that have an 049 = \\$fQEMY
- Add 949 field containing the location code of ‘gdnm’ to all records that have an 049 = \\$fQEMX
The Marc files listed in the screenshot below are the OCLC record files that Marcive uses to send each month to OCLC to set MSU holdings. The files contain abbreviated versions of the marc (MSTUM) records that we load locally from Marchive. DO not load these files, drag them into the matching year done file in the Percon drive.

Ready to Update the Records in the MarcEdit file
- You should already have saved the file either on your desktop or in the Percon/marcive file adding "Load" and date to the end of the MarcEdit file. (ex. MSTUMP2205_Load.mo-day-year[2023]mrk.
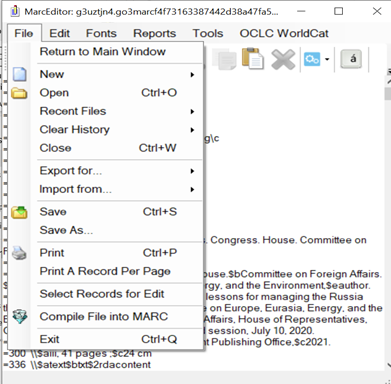
- From the MSTUMP file, Click File > drop to "Select records for edit."
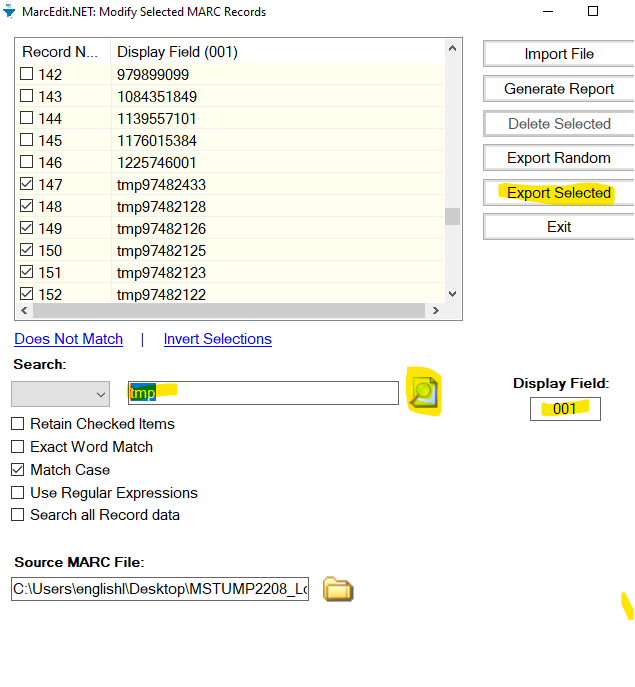
Selected MARC Records by 001 fields to add the 001 tmp #s Into a 949$b field
- See the screenshot below. The MarcEdit steps below find all of the records with an 001 field and then finds the records with a prefix of "tmp.". The process pulls the tmp records into a separate marc file, and then when updates are completed the process puts them back into the original file.
- Change the "Display Field" box from $a245 to 001
- Click Import File.
- Input "tmp" in the search box that is to the left of the file icon.
- Click the search icon box (magnifying glass) on the right.
The result should be a list of 001 fields with a checkmark on the 001 fields that start with tmp.
- Click "Export Selected" records button to produce a marc file of tmp records.
- You will receive a pop-up box stating ‘Selected Records have been extracted.
- Click OK to get the "Selected records have been extracted" message.
- See below for instructions on how to update the records.
You are working from the file that has only the tmp records.
To check that you are in the file that only has records with tmp numbers: Click Report < Field count> Check record #s > close out.
Next, see below to create a new 949 field in the tmp records.

Edit the tmp marc records to create the 949 field with the tmp #s
Click TOOLs > drop down to "Build New Field."
Fill out the Pattern box as shown below. ex. =949 \\$a{001}$f{049}
- The 949 field requires 2 slashes (\\tmp) even though the 001 field does not have slashes.
- Check-mark "Add a new field if not present."
Click on the "Process" button." This will create a 949$a(match on tmp#) field with the data from the 001 field.
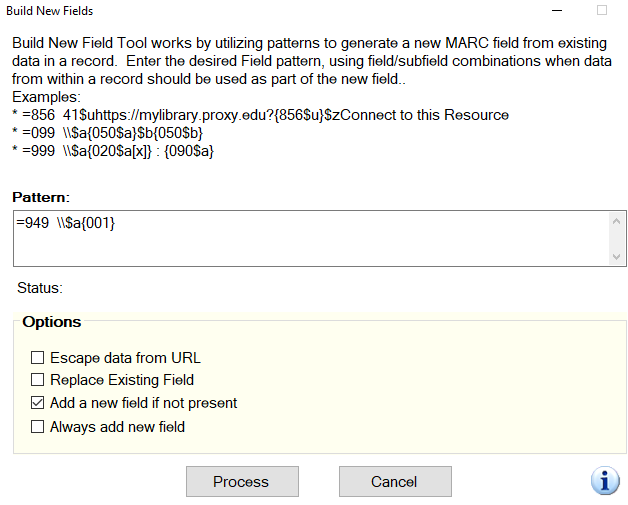
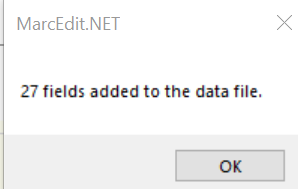
- Click OK on the MarcEdit.NET popup box that reads " . . . fields added to the data file."
- Click "Cancel" to close the "Build New Fields" box.
- The 949 fields have been created, DO NOT save the file yet.
Delete the 003
- Now delete the 003 fields; Tools > select "Add/Delete/Field"
- Insert 003 in the Field box > Click the "Delete Field" button in the right margin.
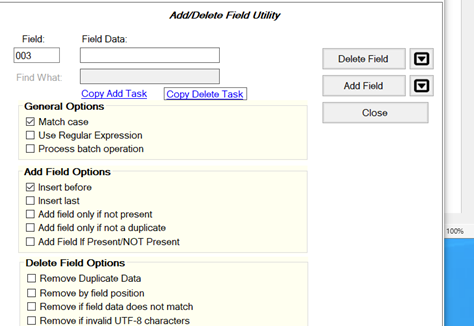
- Click "Close" to exit the "Add/Delete" box.
The final step for this process is to save the file.
- Click File > SAVE (NOT Save As…).
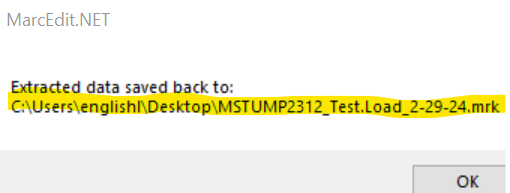
There will be a pop-up message stating ‘Extracted data saved back to where your saved file can be found.
- When you click OK, you are taken out of the marc file.
- Note where your file is saved.
- Find the mrk file again.
- Before moving forward, verify you are in the correct file.
- Click Reports > Field Count to verify that you have the original file with the correct number of records.
- To view all 001 tmp records: Edit > Find > Find What: tmp > Find ALL.
- Verify changes > select one of the tmp records > click jump to > verify changes.
Add 949 field to contain the paper location code of ‘gdus’ to all the records that have an =049 \\$aQEMY
- From the MSTUMP______ file.
Click Tools > "Add/Delete" command.
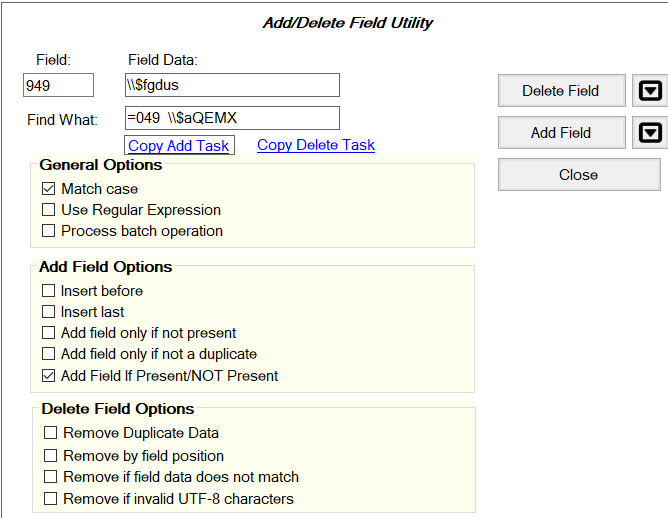
- Input fields as shown below in the Add/Delete Field Utility box:
- Field: 949
- Input "Field Data": \\$fgdus
- Check "Add field if Present/NOT present."
- Leave "Match case" checked.
- Find What: =049 \\$aQEMY (2 spaces between 049 & \\)
- Click Add Field > answer OK to popup.
- (This process will find all the records with an 049 and $aQEMY, and then add the =949 \\$fgdus for holdings location. The Job Profile will not add the holdings records without the $a before the location.)
Use the same steps to add another 948 field for the QEMX fiche record locations ($agdnm).
QEMX Steps: > Add =949 field data, find What: =049 \\$aQEMX > insert field DATA: \\$fgdnm
- If not already checked,check "Add Field if not Present/NOT Present"
- Click on Add Field.
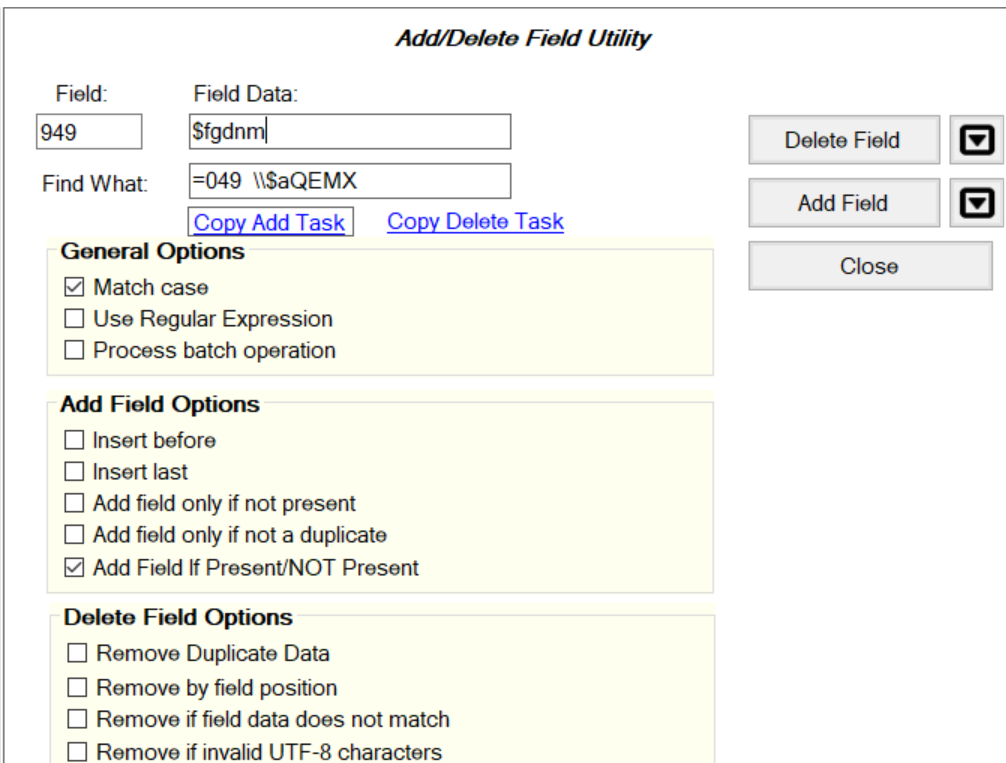
- X out of the "Add/Delete Field Utility" box. Scroll to check that fields are in the marc records.
- Click File > Save the MarcEditor file after these changes are made! (Do not click Save as)
- Proofread the MarcEdit file to check that the edits are as they should be.
- Compile the mrc file > File > drop-down to Compile Records for Edit. Or click on compile icon

- Find this mrc file to run against the Job Profile.
Ready to Run the FOLIO Job Profile
- FOLIO > Data Import > Drag and drop mrc file or choose file.
- Select Job Profile named "CATMAN5 - GPO record overlay based on TMP - gdus/gdnm."
- Click Actions > run > Click Run again from popup.
- After the file has run look at the FOLIO report on that job to look for errors.
- To find the instance records in FOLIO > filter by Instance Statistical Code = MLnonmatch - Monthly nonmatch > find Date Create > Apply.
- To get into a list click Actions > Save Instance UUID's
Create an Excel Spreadsheet used for Processing
- Search FOLIO for the records that have loaded.
- Reset FOLIO if needed > Inventory > Statistical Code, select "CATMAN: MLnonmatch-Monthly list nonmatch
- Date created: enter both from and to dates even if it's the same day> click APPLY.
- Click Actions> Save Instance UUID's (your file is placed in our downloads.
- Find the csv file in your Download file, then the file is ready to run through Data Export
- Example: CSV file name.

- The saved csv file run through Data Export as an mrc file needed to compile the Excel file.
- Example: CSV file name.
- Open Data Export > Drop file into the FOLIO Job box.
- Save the mrc marc file on your desktop. Name appropriately in order to find it.
- Find the file or drag and drop into Data Export > Select JOB PROFILE named "CATMAN export entire SRS record."
- Click Action = Instance = Run Job Profile.
- Ready to export the mrc file to compile the Excel file.
Open MarcEdit to Create an Excel file of the records Exported
- Save mrc file to desktop > file name: MSTUMPxxxxLoad.[date]MonthlyFullBibs.mrc
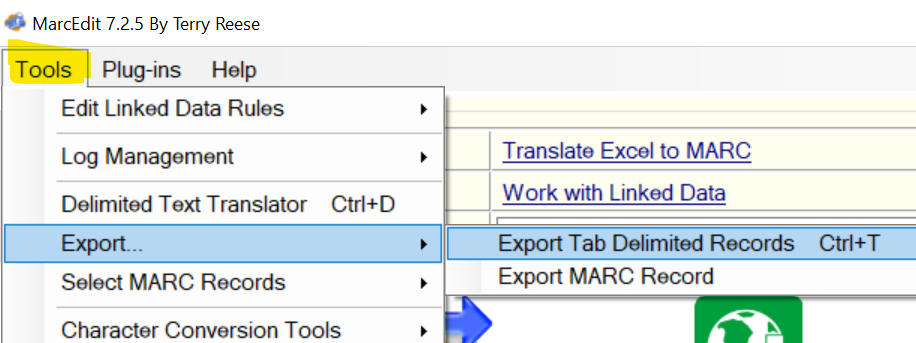
- Open MarcEdit mrk file on your desktop > find Tools > Export > select "Export Tab Delimited Records."
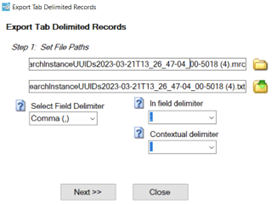
- Click on the file folder (see screenshot below) to set the File Path for the first file, which is the mrc file.

- If the mrc file is not listed, change File name to ALL files.
- Select the mrc file, usually found on your desktop or in the download files.
Copy the link to the first file path and paste into the second file path > Change the second file from mrc to txt file type.
Or click on the open file to choose the file from your computer, but again, change the file to a txt file.
After the files are linked in the file path > change "Select field Delimiter" to comma > Click NEXT.
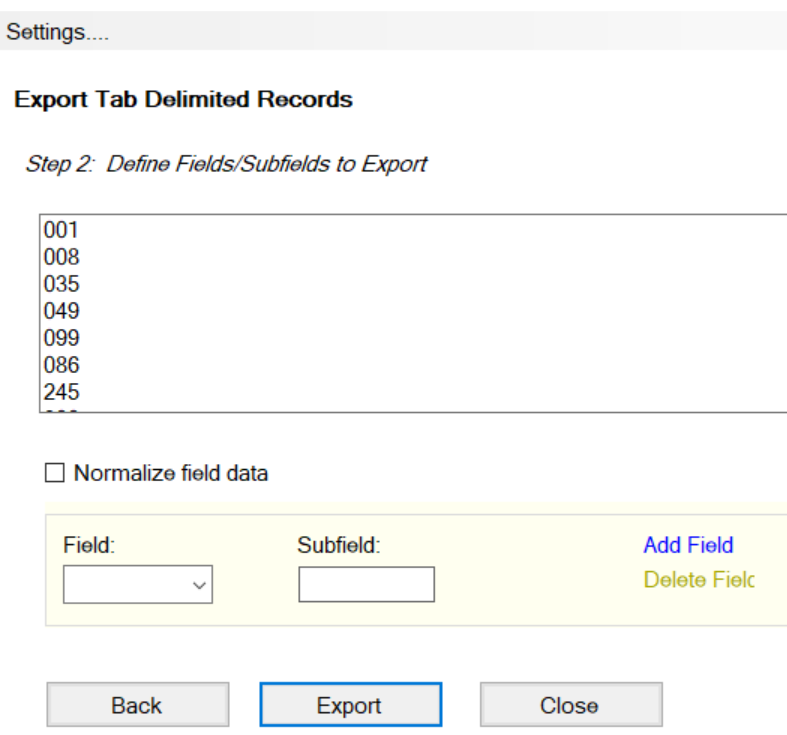
- Export Tab Delimited Box
- Fill in the marc fields you need in the Excel field. (See procedure "Export MARC fields into an Excel Spreadsheet)
- If you choose a different tab-delimited character, remember to choose the same character when opening the Excel file.
- The Excel file should contain 9 columns - fields that are added into the above Export Tab Delimited Records box.
- 001 Instance HRID
- 008 Date
- 035 oclc #s
- Paper/FIche 049
- Call # 099
- Call # 086* (The 086 fields are there in case the material are not found at the 099 call #.)
- Title
- 300 Description
- Shipping List # 500 field
- When finished click "EXPORT"
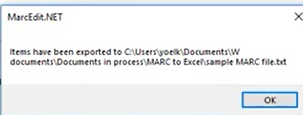
- Before you click OK past this popup box, WRITE down where the file is saved under. My files are saved in the C drive > users > Last name> desktop.
- Open the file as normal in Excel. Match the tab delimited that you picked in MarcEdit.
- The Excel sheet includes multiple delimiter information that needs to be removed. To do that start from the HOME tab and then select the find/replace option.
- Examples: Remove extra fixed field data leaving the dates in the 008 field: 840731d19131950dcu x m f0 a0eng c
- Remove fields using the asterisk* symbol before or after a set of unique characters.
- Asterisk before fields removes characters before the asterisk;
- Asterisk after the unique characters removes characters after the asterisk.
- Highlight the entire column that needs updating.
- In the 008 date field, remove information before the date / ‡d. Retain date one unless there are two dates in both dates one and two field.
- Title field: remove everything after the: / ‡b and you may have to repeat for the
- 500 note fields: retain only the Shipping list no.: [shipping list #].
- Remove fields using the asterisk* symbol before or after a set of unique characters.
- Save the Excel file in the "gd" drive > find the folder named:

- Examples: Remove extra fixed field data leaving the dates in the 008 field: 840731d19131950dcu x m f0 a0eng c
- Type your task here, using "@" to assign to a user and "//" to select a due date
- Lang: English
- file dding
- file-dding
- Fielding
- filed ding
- fielding
- file
- filed
- files
- filers
- filer
- Lang: English
- get
- generate
- getting
- general
- generally
- Lang: English
- to
- too
- today
- together
- top
- Text
- Texts
- Texture
- Texting
- Textures
- Lang: English
- click
- clicking
- clicks
- clicked
- cliche
- Lang: English
- can
- could
- come
- company
- children
- Lang: English
- sac
- SAC
- sec
- spec
- SEC
- Lang: English
- us
- use
- used
- using
- usually
- Lang: English
- naan
- naacp's
- baa
- Ana
- nae
- Lang: English
- name
- national
- natural
- nature
- nation
- Lang: English
- WRITING
- WRITE
- WRITTEN
- WRITER
- WRITERS
- Lang: English
- down the
- down-the
- dozenth
- downtown
- Downy
- Lang: English
- dd
- D's
- d
- dis
- s
- Maced
- Married
- Merced
- Marched
- Marci
- Lang: English
- first
- find
- financial
- five
- finally
- Lang: English
- Chew
- Chewing
- Chewed
- Chewy
- Chews
- Lang: English
- number
- numbers
- numerous
- numerology
- numb
- Lang: English
- need check
- need-check
- soundcheck
- checked
- woodchuck
- Lang: English
- seem
- still
- see
- sound
- say
- Lang: English
- you
- your
- you're
- yourself
- you'll
- Lang: English
- want
- well
- wish
- we
- with
- Lang: English
- for
- from
- first
- find
- few
- Lang: English
- like
- likely
- less
- looking
- located
- Lang: English
- Experience
- Exact
- Extra
- Extent
- Existing
- Lang: English
- desktop
- desktops
- desktop's
- the
- their
- them
- these
- they
- Lang: English
- screens
- screenshot
- screenshots
- Lang: English
- that
- at hat
- at-hat
- a that
- athwart
- Lang: English
- RS
- reasons
- right
- room
- road